This article explains how to install BizTalk Server 2006 on multiple servers for a configuration with 1 SQL Server and 1 BizTalk Server.
Doing a multiserver BizTalk installation should be done once for practice before doing it on the production servers so that all the specificities to a multiserver install are well understood.
I will here share my experience in a practice multiserver BizTalk installation done on 2 Virtual Machines.
Simplified BizTalk Server Installation scenario.
For a first multiserver installation, I will keep a simplified scenario with only 2 servers and neither BAS nor BAM features installed. Only the following components will be installed:
– Enterprise Single Sign-On (SSO).
– BizTalk Group.
– BizTalk Runtime.
– MSMQT.
– Business Rule Engine.
There will be 2 virtual servers:
– 1 Virtual Machine to host SQL Server and act as a Domain Controller
– 1 Virtual Machine to host BizTalk Server.
This is the most basic multi-server install possible. It will nevertheless help you to understand how a multi-server BizTalk installation works.
For more complex installation scenarios with BAM, BAS and/or clustered servers, Microsoft provides a complete installation guide document, “BizTalk Server 2006 Installation Guide – Multiserver”. See in the reference section of this article for a link to the documentation.
Note that to follow this article as a lab, you will need the following software:
– Microsoft Virtual PC 2007 (Virtual PC is now free and you can download it here)
– Windows Server 2003
– SQL Server 2005
– BizTalk Server 2006
The need for a Domain Controller.
A very important difference between a single server and a multi-server installation is that the multi-server configuration requires you to use domain users and groups to run the various BizTalk services making having a domain controller a necessity.
On the other hand, a single server configuration can run with local windows groups and users.
To be more precise, these domain accounts and groups are used for the security configuration of the BizTalk Server databases. Indeed, the user account which runs the BizTalk server service must have access to the SQL Server. As SQL Server is installed on a separate machine, the use of a domain user account is therefore a necessity so that the account can have access rights on both the BizTalk machine and the SQL Server machine.
The important point to remember is that when you plan to install a multi-server configuration of BizTalk in your production environment, you will have to check with your hosting company to have access to a domain controller or to have them create all the necessary domain users and groups.
Create Domain Groups and Users.
For a single server installation, the setup procedure is able to create the Windows Groups and Users necessary for BizTalk as they are created on the local machine.
On a multi server installation, BizTalk Windows Groups and Users must be created manually on the Domain Controller. The setup procedure is not able to create the Windows Groups and Users on a Domain Controller.
BizTalk Installation, Configuration and Applications Deployment considerations.
To be able to install and configure BizTalk Server 2006, you have to log on the server using a Domain User who has Administrator rights on both the SQL Server and the BizTalk Server. Moreover, that domain user must also be part of the BizTalk Server Administrators group and the SSO Administrators group.
The user must also have the sysadmin role on the SQL Server.
I found out something that is, as far as I know, NOT mentionned in the BizTalk documentation: the user installing BizTalk Server must also have the Domain Administrator role. Technically, this privilege does not have to be granted when installing BizTalk Server but only when configuring it. It is because when the BizTalk Server Configuration tool runs, the tool must be able to check if the Windows accounts assigned to the various BizTalk services belong to the Windows groups set for these services. Only a user being domain administrator has the right to check other users properties.
After BizTalk Server is configured and installed, the user does not have to be part of the Domain Administrators group anymore. Moreover, its privileges on the SQL Server can be lowered to dbo instead of administrator. That way the user can be used to install BizTalk Applications without having unnecessary privileges.
FYI, installing BizTalk application creates tables, and executes SP on the BizTalk DBs.
To simplify things I advise to create a “BTSAdmin” domain user who has these rights. Only the person who will install, configure and manage BizTalk applications should have that user login information.
The BizTalk Server 2006 installation guide provides a list of all the necessary Groups and User that need to be created. Microsoft also provides a best practice guide on how to implement the Windows Groups and Users for BizTalk Server 2006.
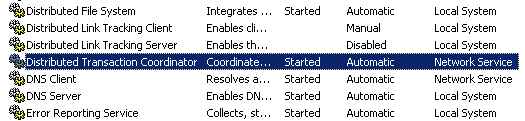
Microsoft Distributed Transaction Coordinator (MS DTC) considerations.
Network DTC access and Network COM+ access must but enabled for all BizTalk and SQL servers. It is turned off by default on Windows Server 2003.
SQL Server Considerations.
SQL Server client tools must be installed on all BizTalk servers. The client Tools installed must be of the same version as the SQL Server installed.
SQL server must be started and running when running the BizTalk Server Configuration tool.
1. Creating the Virtual Servers.
To install the Virtual Servers, you will need Microsoft Virtual PC 2007 and Windows Server 2003.
In this step, we will create 2 Virtual Machines, one named SQLServer and another one named BizTalkServer. Windows Server 2003 will be the OS installed on both of them.
The machine named SQLServer will run SQL Server and also act as a Domain Controller while BizTalkServer will host BizTalk Server.
As installing Windows Server 2003 on a virtual machine is particularly slow, please refer to a previous post that explains how to install and clone virtual servers efficiently.
Once the 2 virtual machines are ready, set their networking setting to “Local only”. This option gives you networking support between virtual machines only. For a description of the different network settings available for Virtual PC, check the following link: http://support.microsoft.com/kb/833134
2. Installing the Domain Controller and creating Windows User and Groups.
2.1. Complete the setup of the SQLServer Virtual Machine.
1. Rename the VM. If you created the SQLServer Virtual Machine by using a base virtual machine and “sysprepped” it, you will need to rename it first. To do so, go to Control Panel > System > Computer Name and click “Change”. Input “SQLServer” in the machine name field. When prompted, do not restart the machine yet.
2. Set the Virtual Machine IP address. Set the SQLServer VM to have a static IP address of 192.168.0.1 – The 192.168.x.x address range is a typical IP range for private networks.
To modify the IP address of the VM, go to Control panel -> Network Connections -> Local Area Connection -> Properties -> TCP/IP -> Properties and use 192.168.0.1 for the IP address as well as the DNS server. In the subnet mask field type in 255.255.255.0 and leave the default gateway blank.
You must now reboot the SQLServer virtual machine.
2.2. Installing the Domain Controller.
Start the SQLServer virtual machine as it is the machine chosen to act as a Domain Controller (DC).
For this step, have the Windows Server 2003 installation disk at hand as it might be needed.
1. Make sure that you restarted the server after it has been renamed. This is because Active Directory can’t be installed after you changed the computer name without rebooting first.
2. Run “Manage Your Server”, and click “Add or Remove a Role” (next to “Adding Roles to Your Server” area).
3. Select the radio button “Typical configuration for a first server” and click “Next”.
4. Type in “biztalk.local” for your Active Directory domain name and click “Next”.
5. In the NetBIOS Name screen, accept the default setting and click “Next”.
6. In the Forwarding DNS Queries screen, select “No, do not forward queries” and click “Next”.
7. Click “Next” again and “OK” in the pop up window. If prompted to insert Windows Server 2003 disk, click on “Use Physical Drive” in the “CD” menu of the windows containing the Virtual Machine. You might additionally have to point to some files in the \I386 folder located on the Windows Server installation disk.
8. When the installation is almost complete, the VM will restart and finish the DC setup. Once the virtual machine has rebooted itself, a “Server Configuration Progress” window will open; click “Next” and “Finish”. The domain controller installation is now completed.
Note: Once your server is promoted to be a Domain Controller, the local administrator is promoted to become the domain administrator.
Moreover, it is not possible to log on the local machine anymore; you can only log on the domain. The concept of local Users and Groups doesn’t exist anymore and if you try to run lusrmgr.msc, a message will be displayed saying that is not possible to manage local groups and users on a Domain Controller. Only domain groups and users can be created and managed.
2.3. Create BizTalk Domain Users and Groups.
Start the Domain Controller, the SQLServer VM.
As we don’t install all the features of BizTalk Server, we create only a subset of the Windows Users and Groups defined for BizTalk Server 2006. This subset of Groups and Users is tailored for the features installed in this article.
1. Run “Manage Your Server” and click on “Manage users and computers in Active Directory”, located next to the “Domain controller (Active Directory)” area. This will open the Active Directory Users and Computers MMC (Microsoft Management Console). Alternatively, you can open it by going to: Control Panel > Administrative Tools > Active Directory Users and Computers.
2. Expand biztalk.local
3. Create a BizTalk Organizational Unit. To keep things tidy, we place the BizTalk Users and Groups in an Organizational Unit (OU). To do so, right click on “biztalk.local” and click New -> Organizational Unit. For the Organizational Unit name, enter “Biztalk”.
4. Create the Windows Groups. These groups will be used for the security configuration of the BizTalk Server databases. Right click on the Organizational Unit “BizTalk” and click New -> Group. For each group created, enter the group name specified in the table bellow, keep the default settings and click “OK”.
| Group Name |
| SSO Administrators |
| SSO Affiliate Administrators |
| BizTalk Server Administrators |
| BizTalk Server Operators |
| BizTalk Application Users |
| BizTalk Isolated Host Users |
There are 6 Groups created in total.
5. Create the BizTalk Windows Service Accounts (Windows Users). Windows Users are required for the various BizTalk services. You might want to set all the users to use the same password so that managing them is easier. Right click on the Organizational Unit “BizTalk” and click New -> User. For each user created, enter the full name and the user logon name specified in the following table (under the “Full Name” and “User logon name” columns) and click “Next”. In the following screen, enter the user’s password, uncheck “User must change password at next logon”, check “User cannot change password” and “Password never expires”. Finally, click “Next” and “Finish”. Repeat the procedure for every Windows User.
| Full Name | User logon name |
| Enterprise Single Sign-On Service | SSOService |
| BizTalk Administrator | BTSAdmin |
| BizTalk Host Instance Account | BTSAppHost |
| BizTalk Isolated Host Instance Account | BTSIsolatedHost |
| Business Rule Engine Update Service Account | ReuService |
6. Add the Windows Service Accounts to their respective Groups.
| Windows Group | Windows User |
| Server Administrators | biztalk\BTSAdmin |
| SSO Administrators | biztalk\BTSAdmin and biztalk\SSOService |
| BizTalk Application Users | biztalk\BTSAppHost |
| BizTalk Isolated Host Users | biztalk\BTSIsolatedHost |
7. Close the Active Directory Users and Computers MMC.
Remember that the Windows Users will be used to run the different BizTalk services and the Windows Groups are used to manage security and access rights to the SQL Server.
In case you would install all the BizTalk server features, you can find a complete list of Windows Users and Groups needed for BizTalk Server in the BizTalk Server 2006 installation guide. You should also read the Microsoft guideline to implement Windows Groups and Users for BizTalk Server 2006.
2.4. Chose the Domain User performing the BizTalk multiserver installation.
If you continue the installation procedure logged on the virtual servers with the Domain Administrator, you don’t need to do this step. Nevertheless, in real environments, you will most likely not want or have the possibility to use the Domain Administrator to install BizTalk Server. In that case, you will have to create a domain user who is Administrator on both BizTalk and SQL Server machines and also member of the “BizTalk Server Administrators” and “SSO Administrators” groups.
In this practice installation, we will choose the BTSAdmin domain user that we have just created to execute the BizTalk Server 2006 multi-server installation. As we added BTSAdmin in the “BizTalk Server Administrators” and “SSO Administrators” groups already, the remaining task is to give the user administrator privileges on both the SQLServer and the BizTalkServer VMs.
2.5. Configure the SQLServer VM Administrator and SQL Server sysadmin Role.
To give BTSAdmin administrator privileges of the SQLServer VM:
1. Run “Manage Your Server” and click on “Manage users and computers in Active Directory”, next to the “Domain controller (Active Directory)” zone.
2. Under the “Builtin” folder, add “biztalk\BTSAdmin” to the “Administrators” group. Note that in our lab this will unintentionally make the BTSAdmin user a domain administrator, but in a normal scenario, SQL Server would not be a Domain Controller and so BTSAdmin would just be administrator of the local machine.
As by default the Windows Builtin\Administrators group has the sysadmin SQL role on the SQL Server, the BTSAdmin user will also have the sysadmin role as BTSAdmin is now part of the Administrators group. Once SQL Server is installed, you will be able to check that by opening the SQL Server Management Console, go to “Security\Server Roles” and double click on the “sysadmin” role. The pop up window will show all the windows and SQL logins having the sysadmin role.
3. Installing SQL Server.
3.1. Install SQL Server.
In this step, we will install SQL Server 2005 on the virtual machine that will host the BizTalk databases.
Only a subset of the SQL Server 2005 components are needed for the BizTalk features we have chosen to install. These are: “SQL Server Database Services” and “Workstation components, Books Online and Development tools”.
If you plan to install the BAM component of BizTalk Server, you will have to additionally install the following SQL Server 2005 components: “Analysis Services”, “Notification Services” and “Integration Services”.
The SQL Server service should use the Local System account as the Service Account, and you should configure the SQL Server Agent to start at the end of the setup.
SQL Server 2005 installation procedure:
1. Start the Virtual Machine SQLServer. Log on using the domain user you have chosen to use for the BizTalk multiserver installation (see paragraph 2.4).
2. Start the setup of SQL Server from its installation disk.
3. On the SQL Server Installation welcome screen, click “Server components, tools, Books Online, and samples”.
4. Accept the license terms and conditions and click “Next”.
5. On the Installing Prerequisites screen, click “Install”. Note that all the necessary prerequisites, such as the .Net Framework 2.0, are present on the installation disk.
6. Once the prerequisites are installed, click “Next”.
7. On the Welcome to the Microsoft SQL Server Installation wizard, click “Next”.
8. On the System Configuration Check, click “Next”.
9. Enter the registration information on the Registration screen, click “Next”.
10. On the Components to Install screen, chose the 2 components “SQL Server Database Services” and “Workstation components, Books Online and Development tools”, click “Next”.
11. Leave the “default instance” radio button selected on the Instance Name screen, click “Next”.
12. On the Service Account screen, make sure that the check box “Customize for each service account” is cleared; select the radio button “Use the built-in System account” with “Local System” selected in the dropdown list. Note that you could also use a Windows User account instead and if you do so, enter a local account or domain account and its password. Lastly, tick the check box “SQL Server Agent” in the “Start Services” section so that the SQL Server Agent starts once the setup is completed. Click “Next”.
13. In the Authentication mode select “Windows Authentication Mode”. Note that Mixed Mode can also be used but it is potentially less secure and not advised by Microsoft. Click “Next”.
14. On the Collation Settings screen leave the default and click “Next”.
15. Click “Next” again and then “Install”.
3.2. Configuring the SQL Server Virtual Machine.
Once SQL Server is installed, you need to configure it.
3.2.1 Configure SQL Server for Remote Connections.
In order for the BizTalk servers to connect to SQL Server, remote connections need to be enabled.
To do so you need to:
1. Run SQL Server Surface Area Configuration, found in Programs -> Microsoft SQL Server 2005 -> Configuration Tools
2. Once the tool opens, click on Surface Area Configuration for Services and Connections.
3. Locate “Remote connection” under the Database Engine tree and enable local and remote connections for both protocols by selecting “Local and remote connections” and “Using both TCP/IP and named pipes” radio buttons.
3.2.2. Configure Microsoft Distributed Transaction Coordinator (MS DTC).
In order for BizTalk to run against its databases located on a remote SQL server, you will need to turn on MS DTC options (both on the SQL Server and BizTalk Server).
Follow the next steps on the SQLServer VM:
1. Open the Control Panel and open “Add or Remove Programs”. Once open, click “Add/Remove Windows Components”.
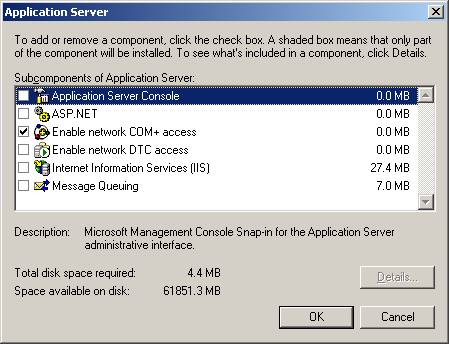
2. Once the Windows Components Wizard open, select “Application Server” and click on de “Details” button.
3. Select the check boxes in front of “Enable network COM+ access” and “Enable network DTC access”. Click “OK”
4. You are now back to the Windows Components Wizard window; click “Next” and then “Finish”.
5. Restart the server.
If your SQL Server is installed on the Domain Controller like in this practice installation, enabling Network DTC Access will not work as there is a bug between DTC and the Domain Controller service. I posted a previous article explaining the problem and how to solve it, see: Enabling network DTC access fails on a Domain Controller server.
3.3 Install and Configure Enterprise Single Sign-On Master Secret Server.
I chose to install the Enterprise Single Sign-On Master Secret Server on the SQL Server virtual machine so that I could try it out.
Nevertheless, it is more common to install the Master Secret Server on the BizTalk Server machine when there is only 1 BizTalk machine.
In case you have a cluster of several BizTalk Server machines, you can chose to either install the Master Secret Server on a separate machine (such as in this example) or install it on one of the BizTalk Server.
The points to remember are:
– There can be only 1 machine being the Master Secret Server. It can either be one of the machines hosting BizTalk Server or any other.
– All machines running BizTalk and the machine being the Master Secret Server will have the Enterprise Single Sign On Windows Service running.
See the Microsoft documentation on installing BizTalk Server 2006 for more details on how to cluster SSO.
1. Start up the BizTalk Server 2006 Installation.
2. On the Microsoft BizTalk Server 2006 Installation Wizard page, click “Install Microsoft BizTalk Server 2006 on this computer”.
3. On the Customer Information page, type your user name and organization, and then click “Next”.
4. Accept the License Agreement and click “Next”.
5. On the Component Installation page, select ONLY “ESSO Administration Module” and “ESSO Master Secret Server”, found under “Additional Software”. Unselect all other components.
6. After the installation, make sure that the checkbox “Launch BizTalk Server Configuration” is selected and click on “Finish”. The BizTalk Server Configuration will start.
7. In the BizTalk Configuration, select the “Custom Configuration” radio button. In the “Service Credential” zone, type in “BIZTALK\SsoService” and its password. It is the domain account that will run the SSO Windows Service. Click “Configure”.
8. In the summary window, click “Next”.
9. On the final window, click “Finish”
10. Use Event Viewer to verify the ENTSSO service has started successfully.
4. Installing BizTalk Server.
In this step, we will install the BizTalk prerequisites, BizTalk Server 2006 and operate the necessary configuration.
Before starting the BizTalk virtual machine, make sure that its network configuration setting is set to “local only”.
4.1. Complete the setup of the BizTalkServer VM.
1. Start the virtual machine BizTalkServer.
2. Change machine name and join the domain. If you created the BizTalkServer Virtual Machine by using a base virtual machine and “sysprepped” it, you will have to rename the VM first. To do so, go to Control Panel -> System -> Computer Name and click “Change”. Change the computer name to “BizTalkServer”.
In the same window, join the domain by selecting the “Domain” radio button and type “biztalk.local” for the Domain name. Click “OK”. You will be prompted to enter the Domain Administrator user name and password.
Before restarting the Virtual Machine you should execute the next step.
3. Set static IP address. To modify the IP address of the VM, go to Control panel -> Network Connections -> Local Area Connection -> Properties -> TCP/IP -> Properties and use 192.168.0.2 for the IP address, 255.255.255.0 for the subnet mask, leave the default gateway blank and set the DNS server IP to 192.168.0.1
You can now reboot the BizTalkServer virtual machine. Note that for the BizTalkServer VM to boot and run properly as being part of the Domain, the virtual machine acting as the Domain Controller will have to be running as well. This means that from now on, the SQLServer VM must already be running when you start the BizTalkServer VM.
4.2. Configure BizTalkServer VM Administrator.
From now on, you will always log on the BizTalkServer VM using a domain account so that you are logged on the domain.
If you chose to execute the installation of Biztalk Server 2006 for a multi-server environment using the Domain Administrator, you don’t need to do this step and you will log on the BizTalkServer VM using the domain administrator account to you install BizTalk Server. Otherwise, continue.
See paragraph 2.4 for more details about choosing a domain account to install BizTalk Server 2006.
Once you have rebooted the BizTalkServer VM, log on the machine using the Domain Administrator account, so you have to log on the domain, not the local machine which is the default choice.
We have previously chosen to give the domain user BTSAdmin administrator privileges on both the SQLServer and the BizTalkServer VMs so that it can execute the BizTalk setup procedure.
To add BTSAdmin user as an Administrator of the BizTalkServer VM;
1. Open “Computer Management” found under Control Panel -> Administrative Tools.
2. Under the “Builtin” folder, add “biztalk\BTSAdmin” to the “Administrators” group.
You can know log off or reboot the BizTalkServer VM and log on again using the BTSAdmin domain user which is now administrator of the BizTalkServer machine.
4.3. Installing prerequisites.
4.3.1 Install IIS 6.0.
BizTalk server requires IIS for the HTTP Adapter, SOAP Adapter, Windows SharePoint Services Adapter, SSL encryption, Business Activity Services (BAS), Human Workflow Services (HWS).
In this step you might need access to the Windows Server 2003 installation disk.
IIS 6.0 installation procedure:
1. Click Start, point to Control Panel, and then click “Add or Remove Programs”.
2. In the Add or Remove Programs dialog box, click “Add/Remove Windows Components”.
3. In the Windows Components Wizard, select “Application Server” and then click “Details”.
4. Select “ASP.NET” and make sure that “Internet Information Services (IIS)”and “Enable network COM+ access” are selected as well. Click “OK”, and then click “Next”.
5. On the Completing the Windows Components Wizard page, click “Finish”.
4.3.2 Install the .Net framework 2.0 or Visual Studio 2005.
If the machine is used for the BizTalk runtime-only (such as on a production environment), you should install the .Net framework 2.0. You can download a redistributable version of .Net 2.0 framework here.
If the machine is used for the BizTalk runtime and/or development, Visual Studio 2005 or the .Net Framework 2.0 SDK should be installed instead.
4.3.3. Install SQL Server 2005 Client Tools.
1. Insert the SQL Server 2005 DVD in the DVD-ROM drive and browse to the \Tools folder and double click “setup.exe“.
2. Accept the licensing agreement on the End User License Agreement page and click “Next”.
3. On the Installing Prerequisites page, click “Install”. Once the prerequisites are installed, click “Next”.
4. On the Welcome to the Microsoft SQL Server Installation Wizard page, click “Next”.
5. On the System Configuration Check page, ensure that there are no errors before you continue. Note that as we are running on a virtual machine there will be a warning for the “Minimal Hardware Requirement”, ignore it and click “Next”.
6. On the Registration Information page, click “Next”.
7. On the Feature Selection page, under “Client Components”, select “Will be installed on local hard drive” for the following Components: “Connectivity Components”, “Management Tools”, “SQLXML Client Features” and “Legacy Components”. Click “Next”.
8. Once the components are installed, click “Next” and then “Install”.
9. Once the setup is finished, click “Next” and then “Finish”.
10. Restart the virtual machine.
4.3.4. Configure Microsoft Distributed Transaction Coordinator (MS DTC).
To be able to install BizTalk server (run the BizTalk Configuration tool, to be more precise), install BizTalk applications and run BizTalk applications, network DTC access must be enabled.
Follow the next steps to do so:
1. Open the Control Panel and open “Add or Remove Programs”. Once open, click “Add/Remove Windows Components”.
2. Once the Windows Components Wizard open, select “Application Server” and click on the “Details” button.
3. Select the check box in front of “Enable network DTC access” and make sure that “Enable network COM+ access” is also selected. Click “OK”
4. You are now back to the Windows Components Wizard window; click “Next” and then “Finish”.
5. Restart the VM.
4.4. Installing BizTalk Server 2006.
4.4.1. Considerations:
Before you install BizTalk Server 2006, consider the following:
– If your computer name is longer than 15 characters, BizTalk Server Configuration will not work.
– The account you are logged on as must be part of the local administrators group and have DBA rights on SQL Server. After configuration is complete, you can lower the privileges to DBO.
– When installing BizTalk Server, there will be prerequisites components to install such as ADOMD.NET, SQLXML 3.0 SP3… You can either let the BizTalk Installation Wizard download them and install them for you or you can pre-download a cab file that contains all the prerequisites. You can see a list of all the prerequisite components required by BizTalk server here.
As we don’t have access to the internet from the Virtual Machine in this practice installation (we set the VM Network settings to “Local only”), we first need to download the BizTalk Server 2006 redistributable prerequisites cab file for Windows Server 2003 (32-bit) (BtsRedistW2k3EN32.cab) and then copy it on the virtual machine hard disk.
4.4.2 Install BizTalk Server 2006.
1. Start the BizTalkServer Virtual Machine and log on using the domain user you have chosen to use for the BizTalk multiserver installation (see paragraph 2.4).
2. Start up the BizTalk Server 2006 Installation; Double click on “Setup.exe” located on the root of the BizTalk Server 2006 installation disk.
3. On the Microsoft BizTalk Server 2006 Installation Wizard page, click “Install Microsoft BizTalk Server 2006 on this computer”.
4. On the Customer Information page, type your user name and organization, and then click “Next”.
5. Accept the License Agreement and click “Next”.
6. On the Component Installation page, select the following components: “Documentation”, “Server Runtime (without Base EDI Adapter)”, “Administration Tools” and “Business Rules Components”. Click “Next”.
7. On the Redistributable Prerequisites page, select “Automatically install the redistributable prerequisites from a CAB file” and specify the cab file location. This is the cab file that we pre-downloaded in paragraph 4.4.1. Click “Next”.
8. On the Summary page, verify that the components you selected to install are correct. Click “Install”.
9. On the Installation Completed page, unselect the “Launch BizTalk Server Configuration” check box, and then click “Finish”.
10. You can eventually stop your virtual machine and commit your change if you are using undo disk so that you start a new session when you are running the BizTalk Server Configuration tool.
4.5. Check that MS DTC network access is enabled on all servers participating in the BizTalk multiserver installation.
The last step to install BizTalk Server 2006 is to run the Configuration Tool. For the BizTalk Server Configuration Tool to run, all SQL Server and BizTalk Server machines must have Network DTC access and Network COM+ access enabled. So, before continuing and configure BizTalk, verify that this is the case on all the machines participating in the BizTalk multiserver installation.
In paragraph 3.2.2, I highlighted that there is a bug in turning on Network DTC access on a machine which is a Domain Controller so, double checking that Network DTC access is enabled on all machines can save you from a lot of trouble.
4.6. Configure BizTalk Server and other components.
The BizTalk configuration is the most likely point of failure of the BizTalk multiserver installation. If you use Virtual Machine with undo disks, you should commit your changes to the VM’s virtual hard disk before running the BizTalk Server Configuration Tool so that you have a fresh session when starting the configuration process. In that case, if the configuration fails, you will be able to cancel the change and go back to the state the Virtual Machine was before starting the BizTalk configuration. This means that the only thing you would have to re-do is to run the BizTalk Configuration again (after fixing the cause of the problem) but all previous installation tasks will be preserved.
1. Starts the BizTalk Server Configuration from the Microsoft BizTalk Server 2006 menu (Programs -> Microsoft BizTalk Server 2006).
2. Select the “Custom configuration” radio button. “Basic configuration” can be used for single server installation only. For the “Database server name”, type in the name of the machine hosting SQL Server: “SQLServer“. For the “User Name” type in “BIZTALK\BTSAdmin” and its password. Click “Configure”.
3. You are now on the Overview Panel of the BizTalk Configuration tool. You will now configure all the BizTalk components per section.
4. Enterprise SSO. Click on Enterprise SSO; tick the checkbox “Enable Enterprise Single Sign-On on this computer”. Select the radio Button “Join an existing SSO Sytem”. For the Database configuration, make sure the Server Name is “SQLServer” and the DB Name is “SSODB”. Set the account name to “BIZTALK\SsoService” for running the SSO Windows Service.
5. Enterprise SSO Secret Backup. No change as the Master Secret Server is the SQLServer machine, not the BizTalkServer machine. See paragraph 3.3 in which we installed the Enterprise SSO Master Secret Server. Once BizTalk is fully configured, you will be able to verify that by running the SSO Administration snap-in and check the value of “SSO Secret Server” field under the “system” sub-tree.
6. Group. Tick the checkbox “Enable BizTalk Server Group on this computer”. Select the radio button “Create a new BizTalk Group”. Under “Data Stores”, check that the Database Server Name is set to “SQLServer” for the 3 BizTalk databases that will be created. Under “BizTalk Administrative Roles”, change the Windows Group to use “BIZTALK\BizTalk Server Administrators” and “BIZTALK\BizTalk Server Operators”. Be careful that the default values are Windows Groups with the same name but local to the BizTalk machine (not the Groups defined in the Domain).
7. BizTalk Runtime. Tick the checkbox “Register the BizTalk Server runtime components”. Make sure that both checkboxes “Create BizTalk In-Process Host and Instance” and “Create BizTalk Isolated Host and Instance” are checked. There is no need to tick the “Trusted” checkboxes. Select “Trusted” only if you want to pass the credentials (SSID and/or Party ID) of the sender when submitting messages to the MessageBox database. This is equivalent to creating a trust relationship between the servers.
Under “Windows Service”, Change the account names to “BIZTALK\BTSAppHost” for the BizTalk Host Instance Account and “BIZTALK\BTSIsolatedHost” for the BizTalk Isolated Host Instance Account.
Under “Windows Group”, change the Windows Group to “BIZTALK\BizTalk Application Users” and “BIZTALK\BizTalk Isolated Host Users”. Be careful that the default values are Windows Groups with the same name but local to the BizTalk machine.
8. MSMQT. No changes.
9. Business Rule Engine. Tick the checkbox “Enable Business Rules Engine on this computer”. Make sure that the Server Name is “SQLServer” and the Database Name is “BizTalkRuleEngineDB”.
Under “Windows Service”, set the Account name to “BIZTALK\ReuService”.
10. HWS Runtime. No changes.
11. BAM Tools. No changes.
12. BAM Alerts. No changes.
13. The configuration is now finished. Click on “Apply configuration”. Review the configuration settings and click “Next”. This is the most likely point of failure in this lab, hence the usefulness of undo disks. If things go bad, look at the problem carefully (you can find clues from the log file generated by the BizTalk Server Configuration tool) and check that you have completed every step of the setup correctly on each server.
4.7. Verify Configuration.
You can check if the configuration went well by having a look at the Windows Event Log, there should be a lot of Information entries and no errors or warning related to BizTalk.
You should also start the BizTalk Server administration console and verify the BizTalk Server host instance is started (found under BizTalk Group\Platform Settings\ Host Instances). Try stopping and starting the host instance.
Finally, deploy and test a simple orchestration, such as the HelloWorld orchestration found in the BizTalk SDK samples.
5. References.
MS documentation – BizTalk Server 2006 Installation and Upgrade Guides.
Simplified BizTalk Server 2006 Installation.
Guidelines for Implementing Active Directory Permissions on Multi Server BizTalk Installations.