Custom Pipeline Component deployment gotcha.

When you create custom pipeline, you might want to compile and install the custom pipeline component in the GAC first before adding the pipeline component in the toolbox. That way, the custom pipeline solution will reference the custom pipeline component from the GAC instead of its location on the disk.
The reason behind this is that if you install the pipeline component library on your production servers only in the GAC and if you did not GACed the pipeline component before using it in the custom pipeline, an exception is raised saying that the custom pipeline cannot be found (as the custom pipeline refers to a custom pipeline component on the local drive instead of the GAC). See a full explanation of the problem on Stephen W. Thomas’ blog.

Note that if you follow the BizTalk documentation on Deploying Pipeline Components, it is advised that the assembly should be deployed in both the GAC and the <installation directory>\Pipeline Components folder. I would advise to follow this way so it won’t matter how you or your developers create and compile the pipeline and their components; it will always work when the code is moved to the production environment and thus avoid unnecessary stress in the case it would have gone wrong because one developer referenced his component in a different way.

EDIT for BizTalk Server 2006 R2:
I have just notice after having published the post that the documentation has been changed for BizTalk Server 2006 R2 and that now the documentation says:

All the .NET pipeline component assemblies (native and custom) must be located in the \Pipeline Components folder to be executed by the server.

and:

You do not need to add a custom pipeline component to be used by the BizTalk Runtime to the Global Assembly Cache (GAC).

So now, Microsoft officially advises to put the custom pipeline component libraries only in the \Pipeline Components and not in the GAC anymore. If you still have BizTalk Server 2006 installed on your machine like I do, you will see that the local BizTalk documentation still says as mentioned in my original post.

BizTalk Server 2006 Custom Functoid Documentation Mistake

When you develop a custom functoid, there are 5 important tasks to do:

  1. Create a resource file with the various resources such as functoid’s name, description, tooltip and icon.
  2. Create the class that will implement the functoid. This class must derive from the Microsoft.BizTalk.BaseFunctoids.BaseFunctoid class.The constructor must override the bas class constructor and call a certain number of methods and properties so that the custom functoid can run properly at run-time as well as integrate well into the Visual Studio’s mapper.
  3. Create a member method in the functoid class that will actually implement the functionality of the custom functoid (its business logic).
  4. Compile and sign the functoid project into an assembly with a strong name key file (so that the assembly containing the custom functoid can be deployed in the GAC).
  5. Copy the assembly to C:\Program Files\Microsoft BizTalk Server 2006\Developer Tools\Mapper Extensions and add the functoid in Visual Studio’s ToolBox. You must also install the assembly into the GAC so that the functoid is available to BizTalk at runtime.

Today I found out that the BizTalk Server 2006 documentation has a mistake in the custom functoid development section: Using BaseFunctoid, which relates to the point number 2 in my previous list of tasks.
That section says that the constructor of the functoid must make a call to the SetupResourceAssembly method to point to the resource assembly. It details:

Include a resource file with your project. If building with Visual Studio, the resource assembly must be ProjectName.ResourceName.

In my experience this is not true, when I build my custom functoid assembly in Visual Studio, I have to call the SetupResourceAssembly method with FunctoidNameSpace.ResourceName as parameter instead of ProjectName.ResourceName. If I follow the documentation’s advice, the resource information such as functoid’s name and icon do not appear in Visual Studio’s toolbox, proving that the resources could not be found by the IDE.

The only case that it would work as mentioned in the documentation would be if the project name and the namespace of the functoid were identical, which happens by default in Visual Studio. Indeed, when you create a new project with Visual Studio 2005, a default namespace will be created for the project, its value being the project name. You can see the default namespace value by right-clicking on your project files and click “properties”.

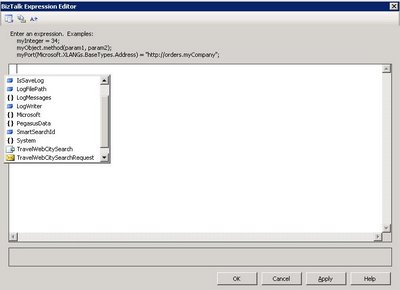
BizTalk Expression Shape IntelliSense

Whenever you want to call IntelliSense from the Expression Shape editor, you can do so by just hitting the keys CTRL + SPACE. You will see the different namespaces, classes and objects (such as local variables and messages) available from the scope of your Expression Shape.

Note that this shortcut key combination actually comes from the Visual Studio .Net IDE. Thus, it is available for any “traditional” .Net project types (C#, VB.NET, Windows form, Web App…)

BizTalk Expression Shape IntelliSense