Failure Importing WCF Extension configuration to BizTalk WCF-Custom Handler

One of the BizTalk application that I am working on has to access web services from a third-party which does not play nicely with WCF. Nothing too uncommon if the third-party is a little exotic.
The solution was that a Custom Message Encoder was written to be able to read the messages coming from the third-party. To configure the WCF runtime stack, a Custom Message Encoding Binding Element was also created. As we want this custom encoder to only be used by that BizTalk application, we created a specific WCF-Custom Adapter Handler for the application and only that handler is configured with the binding extension configuration (instead of doing a change in machine.config or maybe the BTSNTSvc.exe.config).

As I was recreating a new development environment, I tried to import the WCF binding extension configuration file (a .config file containing a bindingElementExtensions element) to the WCF-Custom Adapter handler and got the following error: “Unable to import configuration from file “xxx.config”. (System.UnauthorizedAccessException) Access to path ‘xxx’ is denied.

WCF Extension configuration fails BizTalk Handler

I found out that this was simply because the configuration file was read-only (as it was coming from TFS source control) and that the BizTalk Admin Console first copies the config file to a temp folder and then tries to delete it. As the file is read-only, it cannot be deleted and importing the binding configuration fails!

The solution was simple, I just had to make the file writeable.
I chose to check-out the file temporarily, import the WCF binding extension configuration file and undo the check-out once the configuration was imported through the BizTalk Admin Console.

Notes:

If you are unfamiliar with WCF extensibility, a sample of a Custom Message Encoder sample is available on MSDN at Custom Message Encoder: Custom Text Encoder and the source code of the sample (and other samples) can be downloaded at Windows Communication Foundation (WCF) and Windows Workflow Foundation (WF) Samples for .NET Framework 4.

To import WCF Extension to a WCF-Custom Adapter Handler, open the BizTalk Admin Console, navigate to BizTalk Group\Platforms Settings\Adapters\WCF-Custom and right click the Handler of choice. Click Properties and then click Import.

Import WCF Extension bindings for BizTalk WCF-Custom Adapter Handler

Visual Studio GitHub integration tutorial

Visual Studio GitHub integration tutorial – Getting Started with Git.

This article is aimed at beginners who are new to GitHub and so also probably new to Git repositories. For those, the first thing to say is that GitHub (www.github.com) is a web-hosted Git repository. A Git repository is an implementation of a Distributed Version Control System. A subscription to GitHub is free for public repositories and several paid plans exist for private repositories.

I chose GitHub as Git repository because GitHub is becoming the leader repository for people to share code and collaborate. This is why it is important to know about Git and more importantly to know how to use it.
In this post, I will explain how to create a GitHub repository and how to use it with Visual Studio.
Note that while this tutorial is about GitHub, the Visual Studio integration part is identical regardless of the actual Git repository used. Consequently all the instructions are also valid for other Git repositories whether they are web-hosted (such as Bitbucket – another popular code sharing platform) or on premise (such as Git installed on a rerver or a TFS 2013 Git repository).

For more information about Git, you can read my previous post: Git TFS Visual Studio Integration where I compare different type of repositories (Centralized vs Distributed), introduce Git and explain how Git integrates with Visual Studio and TFS. If you don’t have time to read it, here is short summary: The post explains that Git is a Distributed Version Control System in which all nodes of the distributed system run a full copy of the Git repository. It is therefore comparable to peer-to-peer technology in which there is technically no server – when compared to traditional client/server architecture. However, in practice, a central server is used as integration point for the various members of a team to collaborate. In short, all members upload their changes to the central server and get changes from other members through that central server. In this tutorial, github.com is this central server which has the particularity of being web-hosted. I will refer to it as the remote repository or simply as GitHub. The local repository is the instance of the Git repository running on the user local machine.

The tutorial focuses on creating a GitHub repository and a new Visual Studio solution which will use the GitHub repository as Version Control System.

1. Create a new repository in Github.

  1. Create an account on GitHub at www.github.com. Alternatively, sign-in if you already have an account.
  2. Create a new repository by clicking on the + sign next to your account on the right top corner of the page or by navigating to https://github.com/new.
    GitHub Homepage
  3. On the screen to create the new repository, choose a Repository name and if the repository is Public (free) or Private (available with paid subscription only). Do not tick the checkbox Initialize this repository with a README so that GitHub does not create a default master branch. It would conflict with Visual Studio Team Explorer which will want to create the master branch when publishing a solution for the first time. We can create a README as well as add any other files later on.
    Finally, click on the Create repository button.
    GitHub Create New Repository
  4. We now have an empty repository. Take note of the git repository URL (which ends in .git) as it will be needed later on. As a reminder, refrain from the temptation of adding a README file or any other file right now as it would create a master branch which will conflict with Visual Studio when we sync Visual Studio’s local Git repository to the remote Git repository hosted on github.com.
    GitHub New Empty Repository

2. Create a new Visual Studio Project.

In this simple tutorial I will create a “Hello World” Console Application:

  1. Open Visual Studio and on the start page, choose “New Project…“. Alternatively, on the main menu, click FILE -> NEW -> Project…
    Visual Studio New Project
  2. In the New Project page:
    1. Choose Console Application as project type.
    2. Write the project name in the Name text box. In this example it is HelloWorld.
    3. Choose a Location which is the local folder that will be the root of the local Git repository. In this example it is C:\CodeSCM\Git\.
    4. Make sure to tick the “Create directory for solution” and “Add to source control” check boxes.
    5. Click the OK button.

    Visual Studio New Project Pop Up

  3. Choose Git in the pop-up window asking which source control system to use for the project and click the OK button.
    Visual Studio Choose Source Control Type

3. Adding the solution to the local Git repository.

With Git repositories we first commit changes to the local repository and can do so multiple times before pushing the changes to the remote repository (GitHub in this tutorial). This can be useful when we want to check-in changes only locally so that change history is available but we are not yet ready to publish the code to the shared repository for collaborators to use or for people of the general public to consume (in the case you use GitHub to publish your open source work to the general public).
Once we have created the Visual Studio solution and ready to commit the code for the first time, we can see in Solution Explorer that all the files of the solution are marked as new.
Visual Studio Solution Explorer New Project
To commit the solution to the local (Git) repository, follow the instructions hereunder:

  1. Open Team Explorer (Menu VIEW -> Team Explorer). Make sure you are on the Home page and click on the Changes link:
    Visual Studio Team Explorer Changes Link
  2. In the Changes screen, we will be prompted to configure Git settings to be able to commit to the local Git Repository. Click on the Configure link.
    Visual Studio Team Explorer Changes Prompt To Configure Git
  3. In the next screen we configure the local repository Git Settings by:
    1. Filling in a User Name.
    2. Filling in an Email Address.
    3. Setting the Default Repository Location. The default location is C:\Users\WindowsAccountName\Source\Repos but can be changed as preferred. Here I set it to the same folder I created my Visual Studio Solution in (C:\CodeSCM\Git) as I prefer to put all my solutions there.
    4. If you want, tick the check box Enable download of author images from 3rd party source. When connected to TFS, it will use the TFS user profile image. If no image is set, an image from Gravatar will be used.
    5. Ignore File. Git repositories can have a .gitignore file to avoid committing non-source files that do not belong to the repository; such as temporary files or binaries that are not part of the published product (such as .pdb files). See Git reference Ignoring files for more information.
    6. Attributes File. Git repositories can have a .gitattributes file which defines things such as automatic indentation on commit, instruction on doing diff on binary files, … See Git reference Git Attributes for more information.

    Finally, click the Update button to save the Git settings.
    Visual Studio Team Explorer Git Settings
    Note that the local Git settings are also directly available from the Settings link in the Home page of Team Explorer and that we could have configured them before starting the commit process. It is also how we would modify the Git Settings if we wanted to:
    Visual Studio Team Explorer Home Git Settings

  4. Once the Git Settings are set, we can commit the code. The default policy being that commit messages are mandatory, enter a commit message and click the Commit button.
    Visual Studio Team Explorer Changes Local Commit
  5. Once the commit is completed, we have a commit success message. The message offers to Sync the changes to the remote repository but in this tutorial we will do this at a later stage. We can dismiss the message for now.
    Visual Studio Team Explorer Changes Local Commit Success
  6. The code is now committed to the local Git repository and Visual Studio’s Solution Explorer displays a little padlock icon for committed files.
    Visual Studio Solution Explorer First Commit Complete

4. Code change and local commit in Git – The Edit/Commit model.

In an Edit/Commit model, files are not read-only and we don’t have to do a check-out before editing a file, we can edit files straight away and when we do so, the local Git repository will realize that the file has been modified. Visual Studio’s Solution Explorer and Team Explorer will clearly mark the solution files that have been changed (see screenshots hereunder). It is the case even if we modify the files from outside Visual Studio. This is because Git looks at the content of each file and mark the file as edited only if the content is different. This process is executed efficiently by using metadata about the files, not through full text comparison. Consequently, if we edit again an already modified file and revert it back to its original content, Git will know that the file is now identical to its last committed version. The file will not be considered modified any more and in Solution Explorer, the file will revert back to the unmodified status with a little padlock icon next to it.
Visual Studio Explorer Edited File
Visual Studio Team Explorer Edited File

As with TFVC repositories, we can commit the code from the Solution Explorer (which will take us to Team Explorer) or directly from Team Explorer:
Visual Studio Solution Explorer Commit
Visual Studio Team Explorer Commit

5. Viewing History.

As with TFVC repositories, we can see version history for individual files or the commit history at the repository level for a particular branch.

  • Individual file version history.
    We can see the commit history for each file from the Solution Explorer.
    Visual Studio Solution Explorer File History
  • Repository branch commit history.
    We can see the commit history at the repository level from Team Explorer. On the Team Explorer home screen, click Branches to take you to the Branches screen. In that screen hover the mouse on the branch you want to get the history for (here the master branch), do a right-click on it to bring up the branch contextual menu and select View History. You will notice in the contextual menu of the branch that it is also the place where you can create and merge branches.
    Visual Studio Team Explorer Home Click Branch
    Visual Studio Team Explorer Branches View History
    The History gives a list of the past commits and it is possible to right-click on each commit to see the details of a specific commit. The commit details will show all the files that were committed for that particular commit.
    Visual Studio Master Branch Commit History

6. Publishing the Visual Studio solution for the first time to the remote Git repository.

  1. Once we want to publish the project for the first time to the remote Git repository (GitHub), go to Team Explorer Home and click the Branches link to access the Branches screen. Once there, click the Unsynced Commits link.
    Visual Studio Team Explorer Unsynced Commits link
  2. As we did not configure the remote Git repository yet, we are now prompted to do so. The configuration just consists of the URL of the Git repository. The URL of the repository ends in .git and is available to copy from the GitHub repository homepage. I showed it in the first part of this tutorial on the empty repository home page screenshot. Once you have put the URL, paste ot in the text box and click the Publish button.
    Visual Studio Team Explorer Unsynced Commits Page
  3. We are then prompted with a window to put in our github.com login information:
    Visual Studio GitHub Credentials Prompt
  4. We have now published our solution for the first time to the remote git repository for the master branch.
    Visual Studio Team Explorer Solution Published
  5. On github.com, the repository will now display the files published. We can see the Visual Studio solution file (.sln) as well as the folder for the HelloWorld project. Visual Studio also automatically included the 2 files .gitattributes and .gitignore. Those files did not come out of nowhere, they were visible in the Team Explorer Changes screen when we did the Commit to the local repository (see screenshot). They are out of scope of this tutorial so I won’t go more in details about them.
    GitHub Solution Published

7. Fetch / Pull / Push: Modifying code locally, committing to local Git and publishing to remote Git.

When working in a team we should get updates of the code from the remote repository on a regular basis to make sure that the code we are developing integrates well with the work done by other members of the team. Moreover, it is not possible to commit our changes to the remote repository without having received the latest version of the code first (doing a Pull).

  • Pull
    A Pull is the operation of getting the latest changes from the remote Git repository. It is good practice to Pull the code regularly so that we make sure the code we develop integrates well with the changes made by the team.
  • Fetch
    A Fetch is the operation of getting the list of changes since the last time we Pulled the code. It is useful to Fetch before Pulling so that we can see what are the incoming changes.
    Hereunder is an example of the result of a Fetch, which shows the upcoming changes for the next Pull:
    Visual Studio Team Explorer Fetch Link
    Visual Studio Team Explorer Fetch Result
  • Push
    A Push is the operation of pushing the changes committed on the local Git repository to the remote Git repository.
    Before doing a Push we first need to make sure that everything we want to Push is Committed locally:
    Visual Studio Team Explorer Changes Commit
    Once all the files we want to push are committed locally, we can Push the changes to the remote Git repository:
    Visual Studio Team Explorer Unsynced Commit Push

This ends the step-by-step tutorial of using with Visual Studio with GitHub repositories (or any other Git repository for that matter).

Git TFS Visual Studio Integration

Git TFS Visual Studio Integration

As Git repositories are getting more popular, I write this post in the aim to review the two main type of repositories (Version Control System), what is Git and how they are supported by Team Foundation Server and Visual Studio.

The two types of Version Control Systems (VCS)are:

1. Centralized Version Control System (CVCS)

Centralized Version Control Systems follow a client/server architecture. The repository lives on the server, a central location that all collaborators connect to do all or most of their repository operations. The code history consequently resides on the central server.

This centralized architecture of Version Control is implemented in Team Foundation Server by the Team Foundation Version Control – TFVC implementation. It is how TFS has been implemented since its first release, Team Foundation Server 2005.

1.1. TFVC Server Workspace: Check-in / Check-out Model

All developers are familiar with traditional Version Control Systems such as CVS, SVN, Visual SourceSafe, Team Foundation Server (TFS) to name some of the most popular. They are all Centralized Version Control Systems (CVCS) and have in common that we must ask the central system (the repository) permission to edit a file.
When we get the code base from the central repository, all files are ready-only. We must then ask the server authorization to edit the file by executing a check-out operation. If authorization is granted by the central repository, the read-only flag on the file is removed. We edit the file and when we want to integrate it with the code base on the server, we do a check-in operation. If nobody else changed the file, it is saved in the repository right away, otherwise we need to resolve conflict before saving. This is what is called the “Check-in / Check-out” model.
The check-in / check-out models is thus not designed to work offline as we need access to the repository server to be able to work.
This is the model that has been around since the first Version of TFS (2005) and also in its predecessor Visual SourceSafe.

Note on working offline with server workspace:
As server workspace always need to be connected to TFS, opening a Visual Studio solution without having access to TFS will prompt the user to go in offline mode which then allows us to edit the file, but it is not a seamless experience as we need to do some extra manual step: choose to “go offline” -> overwrite file -> go online -> reconcile -> check-in. As we can see, the Check-in / Check-out pattern for working offline is broken and so it is not an ideal situation. If we need to work offline, it would be better to have a different pattern that works the same way whatever we are online or not. This is what the Edit / Commit Model tries to solve for CVCS. DVCS solves that even better due to its architecture.

1.2. TFVC Local Workspace: Edit / Commit Model

Up until TFS 2012, the check-in / check-out model was the only model supported. There was only one type of workspace, the server workspace which was simply called “workspace” as no other type of workspace existed yet. If the old documentation (for TFS 2005, 2008, 2010) sometimes talk about “local workspace” it only means the folder on your local drive but the workspace itself is actually a server workspace when translated in the new nomenclature.
Since TFS 2012, it is possible to use local workspaces which allows working with TFS temporarily offline while offering a better user experience than with server workspace. Note that due to their client / server architecture, CVCS are not designed for working offline so it will never solve all problems and does not offer a full offline experience but it nevertheless provides a more seamless one.

When we get the code base from the central repository, all files are writeable (no read-only file attribute) which means that it is possible to edit a file without asking permission to the server. While offline, we can also undo uncommitted changes locally and compare the current version of a file with the last version we had before starting to modifying it.
Nevertheless, commits are executed against the central repository (TFS). So, while local workspaces allows us to work disconnected from the server by allowing us to edit files, it is still a Centralized VCS and we must commit to the server. As a result, file change history is still stored centrally in the server. Consequently, many operations cannot be executed offline: creating branches, looking at file history, etc… and therefore local workspaces offer limited offline features beyond being able to edit files while offline.
The list of supported local operations is detailed in the following blog post: Server workspaces vs. local workspaces

On a performance point of view, a disadvantage of local workspaces is that when committing changes to the central repository, the tool will have to scan the entire copy of the code to be able to see which file has changed. This makes that local workspaces do not scale as well as server workspaces for very large code base. By that Microsoft means workspace containing more than 100,000 items! A quite uncommon scenario.
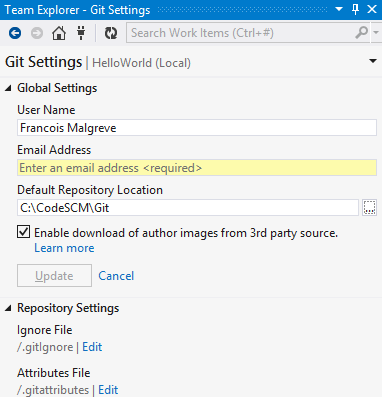
To use local workspaces in Visual Studio, we just need to go to edit the workspace, go to the advanced section and change the Location property to Local. See instructions on MSDN: Create and work with workspaces

Local Workspace vs Server Workspace – best practice:
While local workspaces have limitation when working offline (especially compared to DVCS), it still gives advantages compared to working with server workspaces. Microsoft actually recommends using local workspaces instead of server workspace. See MSDN article Decide between using a local or a server workspace

2. Distributed Version Control System (DVCS).

Distributed Version Control Systems follow a distributed architecture where there is no technical difference between any node running the Version Control System. The complete repository system is distributed among each user by which we mean that every user has a complete copy of a fully functional repository. There is no concept of client having to connect to a server to commit code. This fully functional repository is named the local repository as it is local to every team member.
Advantages of distributed repositories is tat we can do many more things offline than with TFS’ local workspaces. We can create branches, compare version of files, commit changes and so on while being offline. It is worth repeating that every developer has a full Version Control System working on their machine as it is quite a departure from preconceived ideas and old habits that a Version Control System should have a central storage.
Another advantage of DVCS is its performance: as everything is local, no operation has network overhead and no central system must share its resource to various users. Most operations will seem instantaneous.
Having a full copy of the repository also means that when we get code from a repository, we get all the files but also all the history – this can be slow the first time if the project is already large and has a lot of history, but it’s only on the first time as afterwards only changes will be exchanged between repositories .

2.1. Collaboration with DVCS

As everybody commit code locally, integrating everyone’s code is made in a separate operation. In contrast, for a CVCS such as TFVC, integration is made together with the check-in operation (merge operation).
Due to the distributed nature of the DVCS (comparable to peer-to-peer technology), programmers could theoretically collaborate by exchanging set of changes directly from one another. This would nevertheless prove cumbersome in practice as we would have to understand what other team members are working on and everybody would have to keep their computer online all the time so that we can get changes from them at any time we want. This last point would defeat one of the purpose of a DVCS which is being able to work offline.
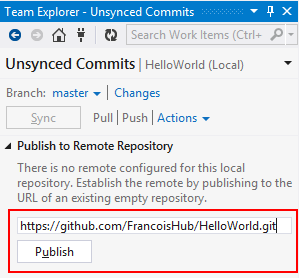
Therefore, in practice, a repository node is set up and dedicated to code integration so that collaboration is eased. That intermediate is called the remote repository (as opposed to everyone’s local repository). All collaborators use the remote repository to push their set of changes to and to pull other people’s set of change. As the remote repository is in the form of a server supposed to be running all the time, collaboration is always possible no matter which collaborators are offline.

3. CVCS vs DVCS, how to choose?

CVCS suits best non-distributed team; meaning team members are (mostly) always online and have access to the CVCS server (mostly) all the time with a reliable and fast network connection. A typical example is a team within an office having TFS running in the corporate network.
With a CVCS, we need to be online to be able to work (so that we can check-out files). Local Workspaces solve this limitation but bring other limitations as they do not offer a full offline experience. Local workspaces still use TFVC (Team Foundation Version Control), which is a CVCS and will never be able to offer full offline experience due to its architecture.
In short: with CVCS, team members develop online.

DVCS suits best for highly distributed teams; meaning that team members can be geographically distributed and/or offline for some time or not having fast or reliable internet connection. DVCS permits to develop offline with a fully feature Version Control System and so we don’t have to be online to work, we only need to be online when we want to integrate our code with the code of other team members.
In short: with DVCS team members develop offline and integrate online.

4. What is Git?

Git is a Free and Open Source Distributed Version Control System.
Git is probably the leading DVCS tool and has great support amongst the open source community and across platforms (Linux, Mac, Windows). It is also supported in Visual Studio since Visual Studio 2012 Update 3.

Apart from being distributed, the main difference between Git and a standard control system (SVN, TFVC…) is that versions are not made of file-based changes, instead each version is a snapshot of a mini filesystem. See the Git Basics documentation for more information about Git’s storage mechanism.
If you want to learn more about Git, you can start at the Git documentation.

5. Git and Visual Studio

  • Visual Studio 2010 and under: Git is not officially supported by Microsoft.
    A Visual Studio extension nevertheless exists on CodePlex for Visual Studio 2010 and 2008. It is called the Git Source Control Provider and is available here (look for the “How to use” section which describes to install it through Visual Studio Tools Extension Manager by searching the online gallery for “Git Source Control Provider”)
  • Visual Studio 2012: Git is officially supported by Microsoft.
    Git repositories are supported by Visual Studio 2012 (uppdate 3 or higher) but it is not included out-of-the-box with the product: A Visual Studio extension for Team Explorer to provide source control integration for Git needs to be installed. This extension has been implemented by people working in the TFS team at Microsoft.
    The Visual Studio 2012 extension is available here: Visual Studio Tools for Git and is in the form of an executable windows installer file: Microsoft.TeamFoundation.Git.Provider.msi.
    The only prerequisite to install the extension is that Visual Studio 2012 Update 3 or higher is installed. At time of writing Visual Studio 2012 Update 4 is available here.
    Here is a screenshot of installing the Visual Studio 2012 extension:
    Visual Studio Tools for Git Setup
  • Visual Studio 2013 ad above: Git is officially supported by Microsoft.
    Git repositories are supported out-of-the-box in the product and no extension is required.

6. Git and TFS

Team Foundation Server 2013 is the first version of TFS giving the choice to run as a CVCS (TFVC repository) or DVCS (Git repository). TFS 2013 is thus able to host standard Git repositories.
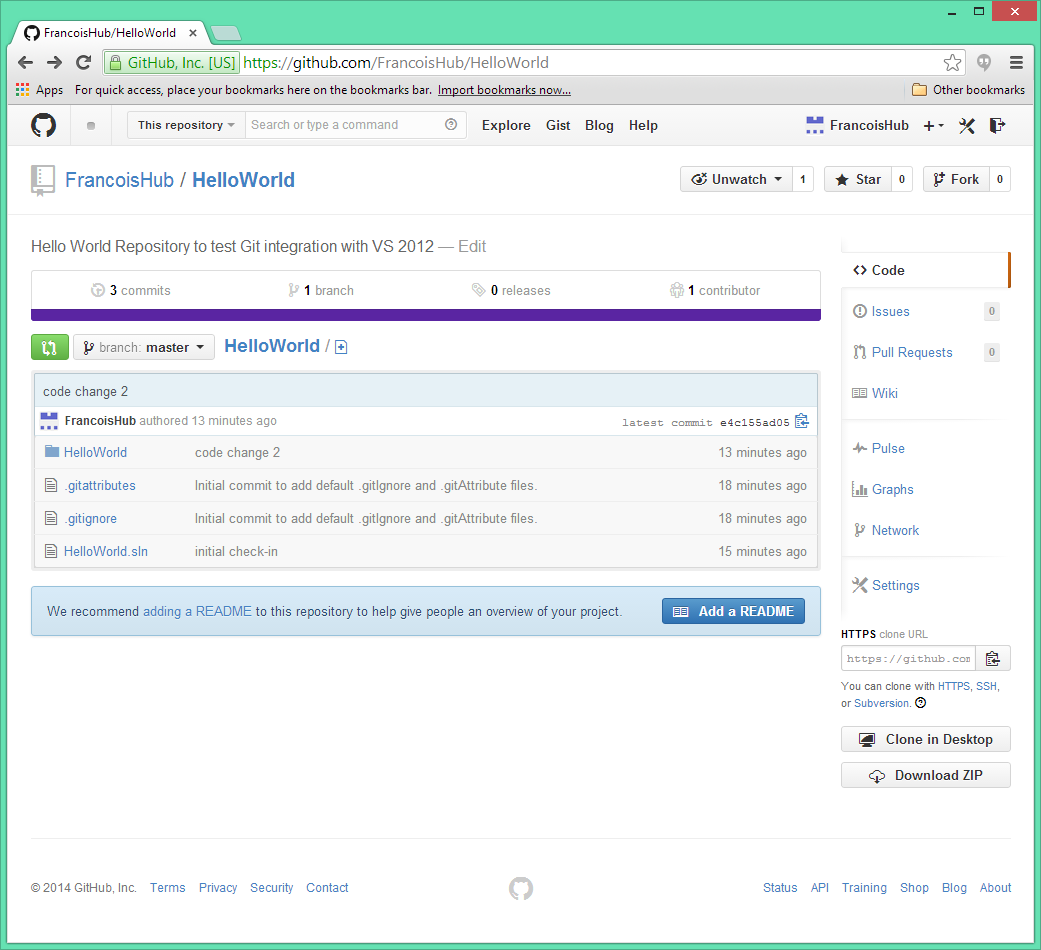
An advantage of using a Git repository (on top of being distributed) is that it enables the numerous third party tools and development environment supporting Git to use TFS Git as their repositories. For example, a company working with multiple technologies could use TFS to host all their code regardless they are web applications developed using Visual Studio or iOS apps developed with Xcode.
It is great to see that TFS 2013 and Visual Studio support standard Git so that it is fully interoperable with other platforms and tools. It looks like Microsoft embraced the open source standards instead of writing their own Distributed Version Control System or worst, their own flavour of Git.

7. TFS in the cloud – Visual Studio Online

Microsoft has also launched the availability of a web-hosted version of TFS in the cloud. It was previously called Team Foundation Service and has now been renamed Visual Studio Online. As with on-premise TFS, it is an ALM (Application Lifecycle Management) on top of being a Version Control System. It is available on www.visualstudio.com.
A Microsoft Account (aka a Windows Live ID) is used to create a Visual Studio Online account. Basic accounts are free for up to 5 users (every additional users must be paid). Different account types exist if more features/tools are necessary. If a team needs a paid account, the Visual Studio Online account will have to be linked with a Windows Azure account through which billing will occur. For more information on pricing, see: Visual Studio Online Pricing Details.
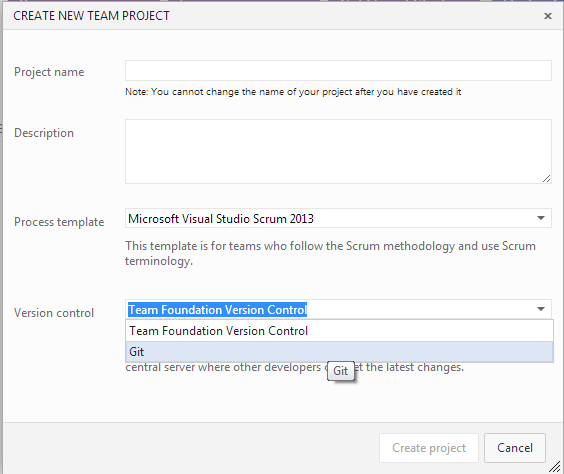
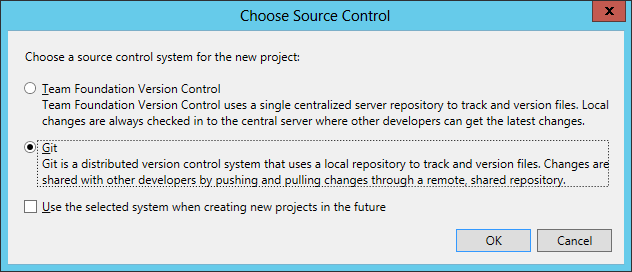
As with TFS 2013, Visual Studio Online can host either a TFVC or a Git repository.
In the screenshot hereunder, we can see that when creating a new Team Project on Visual Studio Online, we can choose the Version Control type, either TFVC or Git:
Visual Studio Online New Team Project

How to see the value returned by a method in Visual Studio Debugger?

In Visual Studio’s Debugger, it has always been a pain to not be able to see the value returned by a method if no variable was assigned to it.
Indeed, the debugger would not give a way to see the value returned by the following method:

static string Concat(string p1, string p2)
{
    return p1 + p2;
}

The only way to see the value before it is returned by the method would be to modify (!) the source code and assign a variable to the result before returning it. This is less than ideal as it means we have to stop the debugging session, modify code and restart debugging. It has unfortunately been a trick many developers have had to use throughout the years.
If we take the example here above, we would change the method to something like the following to be able to see its return value at debug time:

static string Concat(string p1, string p2)
{
    string value = p1 + p2;
    return value;
}


The good news is that starting from Visual Studio 2013 we do not have to do such trick anymore; we can directly examine the return value of a method even if there is no variable holding the value. We can do that at 2 moments in time:

  1. Just before the method returns: When we step over to the end of the method (the curly brace at the end of the method definition).
  2. Just after the method returns: When we step out of the method (back to the line of code calling the method). Note that the return value will be lost after the next Debugger Step Over.

There are 2 places where we can see the method return value:

  • In the Debugger Immediate window, using the $ReturnValue keyword. To open the Immediate window while debugging, choose Debug -> Windows -> Immediate (or press keyboard shortcut: Ctrl + Alt + I).
  • In the Debugger Autos window. To open the Autos window while debugging, choose Debug -> Windows -> Autos (or press keyboard shortcut: Ctrl + Alt + V, A).


Example when Stepping Over to the method end.

The return value will only be visible when we step over to the end of the method (on the curly braces ending the method definition).

In the picture hereunder, $ReturnValue does not return any value as we have not yet reached the end of the method.
Method Return Value Before Method End

In the picture hereunder, we are at the end of the method (on its ending curly brace). At this stage the debugger knows the value returned by the method and $ReturnValue is populated by the debugger. We can enter $ReturnValue in the debugger Immediate window and see that it holds the value returned by the method. The return value is also visible in the debugger Autos window at the entry with the word “returned” in it. The entry is only a placeholder to show the object instance returned by the method (in this case a string) and does not correspond to any actual variable name.
Mothod Return Value At Method End


Example when Stepping Out of the method.

In the picture hereunder we have just stepped out of the method which we want to know its returned value. We can see that the return value is made available by the debugger in both the Immediate and the Autos window.
Return Value When Step Out Of Method

Once we step over to the next line of code in the debugger (F10 shortcut), the entry in the Autos window for the return value is lost and in the Immediate window, $ReturnValue does not evaluate to anything anymore.
No Return Value After Step Out Of Method

Reference: http://msdn.microsoft.com/en-us/library/dn323257.aspx

How to recursively delete files but keep the directory structure through the Windows command prompt?

The other day, I had to clear a structure of hundreds of folders containing over 60Gb worth of logs that we moved to an archive file server. After copying the logs to the archive location, I had to delete all the files while keeping the folder structure. Being accustomed to high level languages for too long, I first wondered how to do this in a batch file. It turns out that the forfiles command would do the task rather simply and elegantly:

forfiles /p D:\Archive\ /s /c “cmd /c IF @isDir EQU FALSE (del /Q /F @file)”

forfiles parameters:
/p -> Path in which the forfiles command will search for files.
/s -> Orders the forfiles command to execute recursively in all subdirectories.
/c -> Command to execute for each file found by forfiles. The command must be in quotes and start with cmd /c.

As forfiles returns all files and folders found within the given path, I simply had to check that the file found is not a directory before deleting it silently using the /Q parameter (the /F parameter forces the deletion of read only files).

For the 60Gb worth of data I had, the command ran for a good 15 minutes and the job was done (no heavy CPU usage or anything else noticeable so it is safe to use even on production environment).